Redesigning Archetyped: Using Mockups
In 1927, Harley Earl, the newly-appointed head of design at General Motors, revolutionized automobile design with the use of clay mockups. The mockups allowed designers identify issues and refine a car’s design to perfection prior to beginning production on the actual car.
By 1931, thanks in part to their refined designs, GM had surpassed Ford as the dominant automobile manufacturer in the industry. Needless to say, clay mockups were adopted by the rest of the automobile industry and it remains an essential part of car design to this day.
The tools may be different, but this short tutorial will show you how to realize the benefits of mockups in your website’s design. By identifying issues early on, you can ensure that your site’s design is ready to roll before a single line of code is ever written.
Also, there’s a toolkit waiting for you at the end of this tutorial to make it even easier to incorporate mockups into your web design workflow, so let’s get going!
Prepare the Canvas
There are a multitude of options for creating mockups for a website’s design. This tutorial will focus on using Adobe Photoshop, the de facto standard for creating and refining website designs.
Start by creating a new document (File > New) using the settings below:
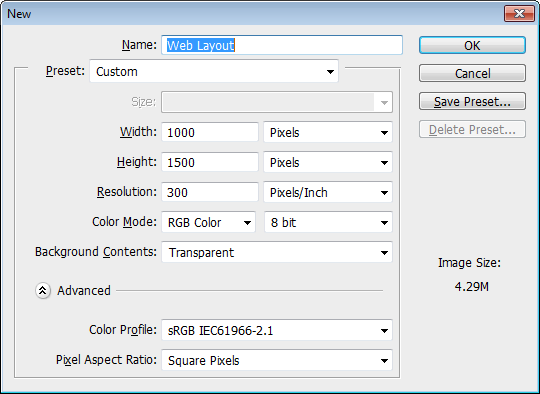
Don’t worry if the dimensions seem odd, we’ll return to that in a minute.
Add Structure
As the website’s layout is based on Foundation, we’ll add some guides that match up with the framework’s grid to give the design some structure that can be built upon.
If you don’t use it already, GuideGuide is an awesome free extension for Photoshop that makes setting up guides quick and painless.
Use these settings in GuideGuide (Window > Extensions > GuideGuide) to create the columns:
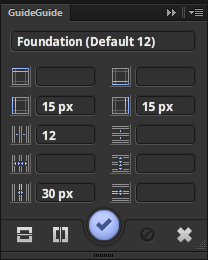
Your layout is now divided into 12 columns:

Extend the Canvas
Finally, resize the canvas (Image > Canvas Size) using the settings below so that mockup will reflect what design will look like in a web browser:
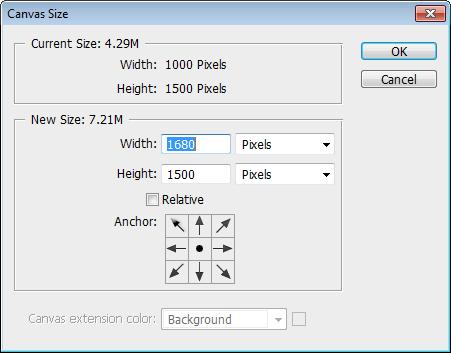
Your final layout is now the proper size with columns centered in the middle:

Set Up Layer Structure
You’re going to be working on multiple layouts and designs in this single document, so a well-organized layer structure is important. Easy reuse of elements between layouts and quick iteration should both be taken into consideration.
Here is a good layer structure for mockups:
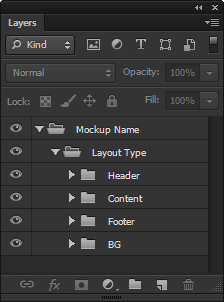
As you’ll see in the next tutorial in this series, an organized layer structure is essential to a smooth workflow that allows you to quickly refine your design.
You now are ready to begin creating mockups for your website, which we’ll cover in the next tutorial.
Bonus: Web Mockup Toolkit
Save time and get your website mockups firing on all cylinders instantly with the Website Mockup Toolkit. The toolkit includes a Photoshop template based on the one created in this tutorial as well as a GuideGuide grid preset so that you can quickly add guides to your existing designs.
You can name your own price for the toolkit (even $0 if you want), but here’s the thing, don’t pay a dirty red cent unless the mockup toolkit saves you time or otherwise adds value to your design process. Instead, give me your thoughts and suggestions so that the toolkit can be improved and expanded. Updates are free for anyone who downloads the toolkit.
Follow the Redesign: New Episodes Every Friday
I’m opening up my design process and sharing everything as I post updates every Friday on Archetyped’s redesign. I’d also love to hear about your own questions and experiences with redesigning your own site, so leave a comment and link below!
- Next up: Building Website Mockups in Photoshop
- Start from the beginning: Redesigning Archetyped