Making of: Favicon Rotator
From a one-line of hack I was inspired to make a “quick and simple” plugin for WordPress. This is the story of how Favicon Rotator came to be.
Inspiration
When designing this site, I created several different favicons. I narrowed it down to the icons that I liked best, but in the end, I couldn’t decide on just one.
Favorite Favicons
Then I thought, “why not both?” and so with a simple line of code, I rewarded my indecision and setup the site’s theme to randomly choose between the two different favicons each time the site was loaded.
<link rel="icon" type="image/gif" href="<?php bloginfo('template_directory'); ?>/images/favicon_<?php echo rand(1, 2); ?>.gif" />
It was a quick solution and I was happy with the end result, but maintainability is a big thing for me and I had thought that it would be great if a site’s favicon could be easily added or changed as simply as adding a photo to a post in WordPress. Even better, if multiple icons were added, it would automatically rotate through them, displaying a random icon each time the site is loaded. I’m not sure if anyone else does that or even wanted such an ability, but after adding multiple icons to this site, I knew it was something I dug.
Exploration
Once I reached a milestone in Cornerstone, I decided to spend some time exploring some of the other ideas I had swirling around in my head. Favicon Rotator was one of the ideas I decided to work on because I felt I could finish it quickly and would be good experience for the next phase of Cornerstone (administration UI’s, etc.).
Planning
The first step was planning out the plugin. The concept was pretty simple (add/manage favicon from admin page) and the ideas I had for implementation (mostly) clear, but I find that it’s a good first step to get those ideas out on paper or screen. Doing this helps to clarify the purpose and expectations for the project, making for a much smoother workflow overall.
I manage the majority of my projects using a customized version of TiddlyWiki (a small and fast self-contained wiki), so the first thing I did was create a new project and set about listing all of the features I envisioned for this project. Total time: 5 minutes.
Feature List: Different colors indicate feature progress
Wireframes
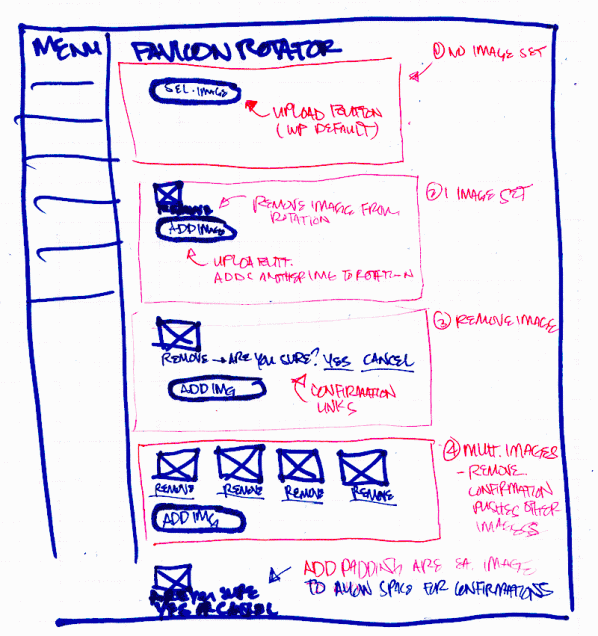
While not always necessary, wireframing is a quick way to iterate through ideas to optimize a layout. The goal was to make it incredibly simple to add a favicon to the site, so sketching out a few wireframes of the admin interface to make it as simple as possible would be time well spent.
I drew out the wireframes with a thick sharpie to keep focus on the overall UI design and to keep from getting lost in the little details at this point. I love to take the time to focus on the tiniest details, but at this phase the big picture was the priority so that I could move to the next phase quickly. This worked out really well and helped me to arrive at an overall layout that I was happy to move forward with after a few iterations. Total time: 45 minutes.
Experimentation
Now that I knew what I wanted the plugin to do and how I wanted it to work, it was now time to develop it! This was the basic order of events during development:
- Build administration UI
- Setup layout (based on wireframes)
- Add functionality to elements (“add new” button, “remove icon” buttons, “save changes” button, etc.)
- Handle retrieving icon(s) from the database
- Handle saving icon selection(s) to the database
- Handle uploading and selecting images to use as icons
- Randomly select an icon and display it when site is loaded
1. Build administration UI
Building the UI was quick and simple thanks to the wireframes. I’ve also used much of WordPress’ own CSS classes for many UI elements (buttons, headers, etc.), which I think is always a good idea because it makes it easier for users to use (since they’re already familiar with WP’s UI), it saves time when building the UI, and it will remain consistent with the rest of WordPress’ admin UI if they ever change the official design. For the icon containers themselves, I’ve decided to keep the design rather simple, but may decide to make them a bit more “WordPress-y” in the future so that it looks fully integrated.
Favicon Management UI
2. Handle retrieving icon(s) from the database
Since the functionality to actually add an icon to the list had not yet been developed (see step 4), I started off by adding some temporary data to the wp_options table where I would be storing the icon selections. Using that data, I developed the functionality to retrieve those values and build an element with the necessary icon information to be displayed to the user. Icon data was also added to a hidden form field that was updated whenever the icon selection was changed.
3. Handle saving icon selection(s) to the database
Though users added/removed favicons in a very visual “point and click” way, saving their changes was a much more straightforward process. Data for the selected icons are stored in a hidden form field which is updated with a dash of Javascript whenever favicons are added and removed from the list. When the “Save changes” button is clicked, the value from this form field is simply saved to the database.
4. Handle uploading and selecting images to use as icons
WordPress already has fairly robust media management capabilities built-in and since I’ve used it quite a bit in Cornerstone, I decided to use it in Favicon Rotator too. Mind you, this is not simply plug and play as there are a number of hoops to jump through to place nice with WordPress. Thankfully, no hacks are needed (mostly) because WordPress’ provides the necessary plugin hooks.
Launching the media upload UI
Launching the media upload UI is pretty straightforward. Just build a link to admin/media_upload.php with the appropriate URL query variables set.
<a href="https://archetyped.com/wp-admin/media-upload.php?post_id=0&tab=type&type=fvrt_icon&fvrt_action=1&TB_iframe=1" class="thickbox">Open Upload UI</a>
The necessary URL query variables are:
post_id– The ID of the post that the media is being uploaded for. Media uploads are referred to as “attachments” in WordPress because they are attached to other content (posts, pages, etc.). In this case, we don’t want to attach the upload icons to a specific post, so we just set this variable to0tab– The media management UI has several tabs, each with a different purpose (upload media, browse library, etc.). The upload tab is displayed by default, but in this case, this variable is set totype, which will cause the type URL variable to be processed (see below for why)type– The type of media being uploaded/browsed (image, audio, video, etc.). When the type is processed, WordPress fires an action formatted asmedia_upload_{type}, so in our case, an action calledmedia_upload_fvrt_iconwill be fired. I can then hook into this action to gain control over how uploads are handled.fvrt_action– Specifies that the media upload UI was launched by Favicon Rotator. This is a custom variable I add so that I can quickly determine whether to hook into the actions and filters fired by the media upload UI (e.g. when the UI is launched to upload images for a post, I don’t need to hook into it).TB_iframe– Whether or not the media UI is launched in an iframe (which it is in when used on the post edit form and in Favicon Rotator).
Also, by adding class=”thickbox” to the link, the resulting link will open in a non-modal popup (a lightbox) without leaving the current page. I also needed to load the necessary files for the thickbox functionality:
add_thickbox(); //Adds thickbox files to page header
Add an “Add icon” button to uploaded media
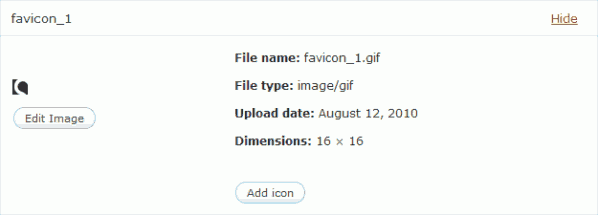
Once the media upload UI is displayed, we need a way for the user to select an image and add it to the list of favicons. To do this, Favicon Rotator hooks into the attachment_fields_to_edit filter to modify the fields/buttons that are displayed when viewing an attachment’s details in the media management UI.
Using this filter, all extraneous edit fields and buttons are removed (to keep things as simple as possible) and the “Add icon” button is added.
The end result is a clean UI with a simple button to add an icon to the list
Adding the selected icon to the list
Once the user has clicked the “Add icon” button for an image, the final step is sending the selected icon from the media management UI (in the “lightbox” popup) into the favicon list on the admin page. This is handled in essentially the same way that images are inserted into posts. The basic methodology is as follows:
- User clicks “Add icon” button for an image. This submits a form.
- The form submission is evaluated to determine which image the “Add icon” button was clicked for
- The image’s details (ID, source URL, and file name) are sent via Javascript to the underlying admin page
- The media upload UI is closed
Once the admin page receives the image data, it builds a new icon container for the image and adds it to the list of icons. The image’s ID is then added to the hidden form field that corresponds to the icons in the list.
Finally (phew!), when the user clicks the “Save changes” button, the icon ID’s are saved in the wp_options table for safe-keeping. This is the other benefit of using WordPress’ built-in media management functionality– since attachments in WordPress are essentially posts, we can simply save their ID and reference it to retrieve the rest of their data. As a bonus, WordPress also has several functions specifically for retrieving attachment data (source URL, etc.) which saves us from having to develop those tools ourselves.
Development was clearly the longest phase in the entire process, but it was sped up greatly by the initial planning and wireframing that gave me a clear direction for the entire development phase. Total time: 19 hours
Wrap Up
The initial motivation for developing Favicon Rotator was to provide others with the capability to display multiple favicons randomly like this site does. However, during development, I realized that the real value of the plugin was quite a bit simpler and made it useful to a much wider audience. Favicon Rotator enables anyone to easily add a favicon to their site (regardless of whether or not they want to rotate between multiple icons). Users no longer need to edit theme files, manually upload images via FTP, or copy/paste URL’s to favicon files just to simply add a favicon to their site.
This is a capability that is missing in WordPress at the moment, so while I’m happy that I made a plugin that accomplishes my initial (though obscure) goal of icon randomness, I’m actually more enthused about the plugin’s potential to enable users to easily do something that may have been out of reach for them previously.


