Become a WordPress Troubleshooting Ninja
So you’ve switched themes or installed/updated some plugins and now your WordPress site is not working properly. Worse yet, you have no idea what the problem is.
First of all, don’t worry– we’ve all been there.
Secondly, troubleshooting a problem on your WordPress site is pretty simple and straightforward. This step-by-step guide will transform you into a WordPress troubleshooting ninja that can quickly pinpoint the root of a problem on your site and remove it with exacting precision.
Ninja training begins now.
The Goal: Identify the Conflict
More often than not, when your WordPress site is not working properly after switching themes or updating plugins, it is due to a conflict. There are so many different themes and plugins available for WordPress that sometimes one component will have a compatibility conflict with another.
Therefore, the main goal when troubleshooting a problem on your WordPress site is identifying the conflict.
Some examples of conflicts on a WordPress site are:
- Outdated theme or plugin that uses code no longer compatible with the current version of WordPress.
- Naughty theme or plugin that does things that are discouraged on a WordPress site.
- Incompatible theme or plugin that conflicts with another component (theme or plugin) on the site.
Thankfully, regardless of the reason for the conflict, the same 4 steps can be used to identify the conflict.
Step 1: Start with a Clean Slate
Before you can do anything else, you need to make sure your WordPress site works properly without any third-party components such as themes or plugins.
1.1: Switch to a Default Theme
First, temporarily switch your theme to one of the default themes that come with WordPress such as Twenty-Fourteen.

- Log in to your site’s WordPress admin.
- Go to Appearance > Themes
- Activate the Twenty-Fourteen theme.
1.2: Disable Plugins
Next, we need to temporarily deactivate the site’s plugins.

- While still in your site’s admin, go to Plugins.
- Select all plugins in the list.
Ninja tip: Select all plugins at once by clicking the checkbox in the top row of the plugins list.
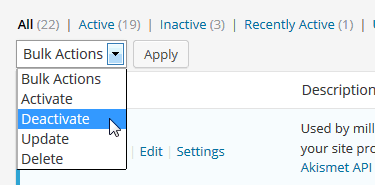
- From the Bulk Actions menu, select Deactivate and click Apply.
1.3: Confirm Functionality
With your site back to its default state, any conflicts caused by third-party components should no longer be present.
Browse through your site to confirm that the problem is no longer occurring.
The Problem Still Exists
If your site is still not working properly when using a default theme and all plugins have been deactivated, then you have a problem with WordPress itself.
Your next steps:
- Check to make sure your site’s server meets WordPress’ minimum requirements. You can contact your web hosting provider to confirm this.
- You may also need to reinstall WordPress. Download a fresh copy of WordPress and follow the installation instructions.
Once you have WordPress working properly in its default state, you can continue following this guide if you are still experiencing a problem.
Step 2: Test the Theme
Now that you have confirmed that the site works properly in its default state, it’s time to test the third-party components, starting with your custom theme.
- In the site’s admin, go to Appearance > Themes
- Reactivate your custom theme.
- View the site to see if the problem has returned.
The Problem Has Returned
If the problem has returned, then the custom theme is causing the conflict. Switch to a different theme and contact the theme’s developer to report your issue.
Step 3: Reactivate Plugins
With the custom theme in the clear, we now move on checking plugins for conflicts.
- Activate the Twenty-Fourteen theme to return the site back to a default state (see step 1.1).
- Go to Plugins.
- Activate a single plugin (any plugin).
- View the site to see if the problem has returned.
- If the site works properly, repeat until all plugins have been activated.
The Problem Has Returned
The last plugin to be activated before the problem returned is the one causing a conflict. Disable the plugin and contact the plugin’s developer to report the issue.
You should continue to reactivate plugins one-by-one to confirm that no other plugins are causing conflicts as well.
Step 4: Test Theme with Plugins
So far you have confirmed that:
- The custom theme works.
- All plugins work.
The final step is to confirm that there are no conflicts between the custom theme and the plugins.
- With all plugins activated, activate your custom theme (see step 2).
- View the site to see if the problem has returned.
If the issue has returned, then you have a conflict between your theme and at least one plugin.
- With the custom theme still active, deactivate all plugins (see step 1.2).
- Activate plugins one-by-one (see step 3) to identify which plugin is conflicting with your custom theme.
The Problem Has Returned
The last plugin to be activated before the problem returned is the one causing a conflict. Disable the plugin and contact the plugin’s developer to report the issue. Be sure to note what theme you are using in your report.
You should continue to reactivate plugins one-by-one to confirm that no other plugins are causing conflicts as well.
Troubleshooting Ninja
Identifying the conflict is the most important thing you can do when you experience a problem on your WordPress site. Armed with this information, you know exactly what component needs to be disabled and who to contact to get the issue resolved.
You are a noob no longer– you are now a WordPress Troubleshooting Ninja who can find the root of any issue on your site now and in the future. Sweet.
Share the Guide
A ninja does not hoard knowledge. Share this guide so that others can join the ranks of troubleshooting ninja as well!
You can also send me a tweet if you have any questions or comments.