Simple Lightbox: Customizing Theme Layouts
Layouts give you amazing control over Simple Lightbox’s appearance and functionality. This tutorial will show you how to create a custom layout for your lightbox theme.
Note: For an overview of themes in general, read Simple Lightbox: Anatomy of a Theme.
It’s Just HTML
You don’t have to worry about learning a complex programming language to create a custom layout for the lightbox. If you are familiar HTML, you can create a custom layout.
For example, here is the HTML layout used by SLB’s default theme:
<div class="slb_container">
<div class="slb_content">
{{item.content}}
<div class="slb_nav">
<span class="slb_prev">
{{ui.nav_prev}}
</span>
<span class="slb_next">
{{ui.nav_next}}
</span>
</div>
<div class="slb_controls">
<span class="slb_close">
{{ui.close}}
</span>
<span class="slb_slideshow">
{{ui.slideshow_control}}
</span>
</div>
<div class="slb_loading">
{{ui.loading}}
</div>
</div>
<div class="slb_details">
<div class="slb_inner">
<div class="slb_data">
<div class="slb_data_content">
<span class="slb_data_title">
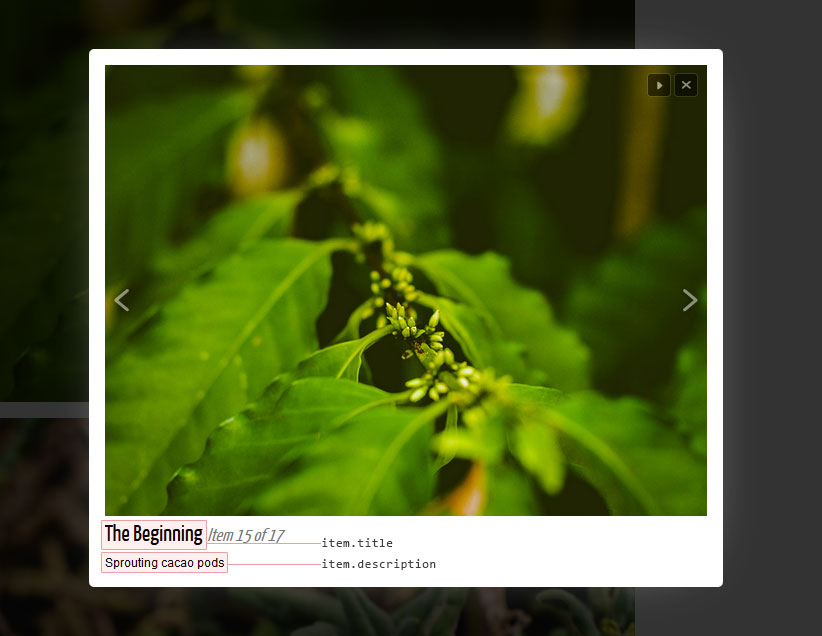
{{item.title}}
</span>
<span class="slb_group_status">
{{ui.group_status}}
</span>
<div class="slb_data_desc">
{{item.description}}
</div>
</div>
</div>
<div class="slb_nav">
<span class="slb_prev">
{{ui.nav_prev}}
</span>
<span class="slb_next">
{{ui.nav_next}}
</span>
</div>
</div>
</div>
</div>
Class Names Matter
Class names assigned to HTML elements in the layout allow you to easily target and style specific elements using CSS. However, it is important to choose the class names wisely.
While efforts are made to keep a site’s default styles from affecting the lightbox’s layout, using common class names such as content is not recommended.
Note how the class names in the layout above are prefixed with slb_ (e.g. slb_content, slb_nav, etc.) to ensure that the site’s styles do not alter the lightbox’s appearance.
Note: Adding IDs to elements in the layout is not recommended as there may be multiple lightboxes using your theme on the same page. Therefore, only classes should be assigned to layout elements.
Template Tags
Template Tags make it super simple to add dynamic content or interactive functionality to the lightbox.
Basic Structure
The basic structure of a template tag is as follows:
{{tag-name.tag-property}}
All template tags are enclosed by 2 sets of curly brackets ({{/}}).
Within the curly brackets you put the template tag’s name (tag-name) and the specific property (tag-property) you want to access for that tag. Most template tags have a variety of properties that you can use to add different data or functionality to the lightbox.
Let’s look at the 2 template tags used in the sample layout.
Item
A lightbox is used to display an item (an image, a video, etc.). The item template tag gives you access to the current item’s properties.
Item Template Tags
Properties
content— The item’s content (image, video, etc.). At the very least, a layout should contain a tag using this property.title— The item’s title.description— The item’s description. For items in your site’s media library, this property outputs the value of the Description field from the library.source— The source URI for the item’s content (e.g.http://site.com/image-file.jpg)permalink— The URI for the item’s dedicated page (e.g. the attachment page for an image in your site’s media library –http://site.com/image-attachment/). If an item does not have a dedicated page, then this value is the same as thesourceproperty.
Example Usage
{item.content} // Outputs the item's content
UI: User Interface
The ui template tag allows you to quickly add interactivity to the lightbox.

UI Template Tags
Properties
loading— Lightbox loading indicator.close— Button to close the lightbox.nav_prev— Button to navigate to the previous item in a group of items.nav_next— Button to navigate to the next item in a group of items.group_status— The position of the currently displayed item within a group of items. This property uses the format defined by SLB’s Slideshow status format option.slideshow_control— Button to start/stop the automatic slideshow in the lightbox.
Example Usage
{{ui.close}} // Outputs close button in layout
Adding the Layout to Your Theme
Now that you’ve created a custom layout, it’s time to add it to your lightbox theme.
Save the layout to the theme’s directory (e.g. layout.html) and then reference the file when registering your theme:
// Theme registration
function my_custom_lightbox_theme($themes) {
    // Theme Properties
    $properties = array (
        'layout'        => '[base_path]/layout.html',
        // other theme properties...
        ),
    );

    // Register custom theme
    $themes->add('my_custom_theme', $properties);
}

// Hook into theme initialization
add_action('slb_themes_init', 'my_custom_lightbox_theme');
Note: All theme assets (including layout files) must be defined using absolute URIs or paths relative to the site’s root directory. Therefore, replace [base_path] in the code above with a value appropriate for your lightbox theme. See the theme overview for more information.
Layouts are Simple
You may have realized it by now, but the driving force behind Simple Lightbox is to keep things as simple as possible.
Just a bit of HTML sprinkled with a few template tags is all it takes to customize the lightbox as little or as much as you need to. You can even rearrange or remove elements entirely from an existing theme simply by creating a child theme with a custom layout.
Have fun creating custom layouts and be sure to let me know if you have any questions about layouts in SLB themes!
Related
- Simple Lightbox — The slickest lightbox on the block for WordPress!
- Anatomy of a Theme — Get an overview of themes in Simple Lightbox.